Native modules for React Native
Reviewed by Mike Grabowski, and Michał Pierzchała at Callstack.
React Native was released 2015 and been evolving since then, it is one of the most impacted technology that Meta released.
This library is so amazing it has a huge active community always helping each other to contribute back to React Native. One of them is Expo, they allow us to create a fast, ready-to-use, ready-to-test app. But React Native is not a one size fits all library, sometimes the one you need will not be implemented yet, or you have a niche use case that everyone rarely runs into. Luckily React Native provided us a way to write our own native module to support this handicap.
This blog is going to be a tutorial, I will be using screen time API from iOS, request authorization and pick an app to limit usage.
Native Modules
According to the React Native document, Your React Native application code may need to interact with native platform APIs that aren't provided by React Native or an existing library.
Now, in 2025 we have three ways to write a native module. Turbo Module, Expo Modules, and Nitro Modules. I'll use Expo Modules for this blog since they're the easiest to use but you can use either one of them for your projects, they all rely on React Native.
But to give you a fresher look, depends on the way you choosen, your library will be wriiten in:
- Turbo Native Module: written in Java/Kotlin, Obj-C/Swift/C++
- Expo Modules: written in Kotlin, Swift
- Nitro Modules: written in Kotlin, Swift
This video by Oscar Franco is going to bring you the technical breakdown between each native module. TL;DL not everything is perfect. Pick the right tool for the job.
Prerequisites
- Xcode latest version, I'm currently using 26.1.1 but 15.2 works fine too.
- An Apple Developer account to enable Family Controls Capability.
- Last but not least a real device. THIS ONLY WORKS ON A REAL DEVICE.
- EAS CLI to build development build. This tutorial WILL NOT work in Expo Go.
Initialize a new module
First, create a new module. You can name this anything you want, depending on your taste. I want my module to be local in my project, so I will add --local argument but you can leave it if you want to publish it to npm later. Also, I will be using bun in this project, you can use other package managers, the result will be the same.
$ bunx create-expo-module expo-apps --local
Need to install the following packages:
create-expo-module@1.0.10
Ok to proceed? (y) y
You can hit return for all the prompts to accept the default values.
The local module will be created in the modules directory in the root of your project. Learn more: https://expo.fyi/expo-module-local-autolinking.md

✔ What is the name of the local module? … expo-apps
✔ What is the native module name? … ExpoApps
✔ What is the Android package name? … expo.modules.apps

⠴ Downloading module template from npm
Couldn't download the versioned template from npm, falling back to the latest version.
✔ Downloaded module template from npm registry.
✔ Created the module from template files

✅ Successfully created Expo module in modules/expo-apps

You can now import this module inside your application.
For example, you can add this line to your App.tsx or App.js file:
import ExpoAppsModule from './modules/expo-apps';

Learn more on Expo Modules APIs: https://docs.expo.dev/modules
Remember to re-build your native app (for example, with npx expo run) when you make changes to the module. Native code changes are not reloaded with Fast Refresh.
Setup workspace
Since we're not developing features for web and Android, we will clean the workspace by removing those files, but you can leave them. This is an iOS-only tutorial.
- cd modules/expo-apps
- rm android/src/main/java/expo/modules/apps/ExpoAppsView.kt
- rm src/ExpoAppsView.tsx src/ExpoAppsView.web.tsx src/ExpoAppsModule.web.ts
Clean the boilerplate
We will clean the code generated by Expo by removing unused methods and constants.
// expo-module.config.json
{
  "platforms": ["apple"],
  "apple": {
    "modules": ["ExpoAppsModule"]
  }
}
// index.ts

export * from "./src/ExpoApps.types";
export { default } from "./src/ExpoAppsModule";
// ExpoApps.types.ts

export type ExpoAppsModuleEvents = {};
// ExpoAppsModule.ts

import { NativeModule, requireNativeModule } from "expo";

import { ExpoAppsModuleEvents } from "./ExpoApps.types";

declare class ExpoAppsModule extends NativeModule<ExpoAppsModuleEvents> {}

// This call loads the native module object from the JSI.
export default requireNativeModule<ExpoAppsModule>("ExpoApps");
It's a good choice that you will build a development build using EAS first in order to setup necessary credentials using bunx eas build -p ios --profile development.
Setup entitlement
In app.json you also need to add entitlement.
// app.json

  "expo": {
    "ios": {
      "entitlements": {
        "com.apple.developer.family-controls": true
      },
    }
  }
Make a function in Swift
With that all setup, we can start implement our function by regenerating native code using prebuild and open Xcode.
$ bunx expo prebuild -p ios --clean
$ xed ios
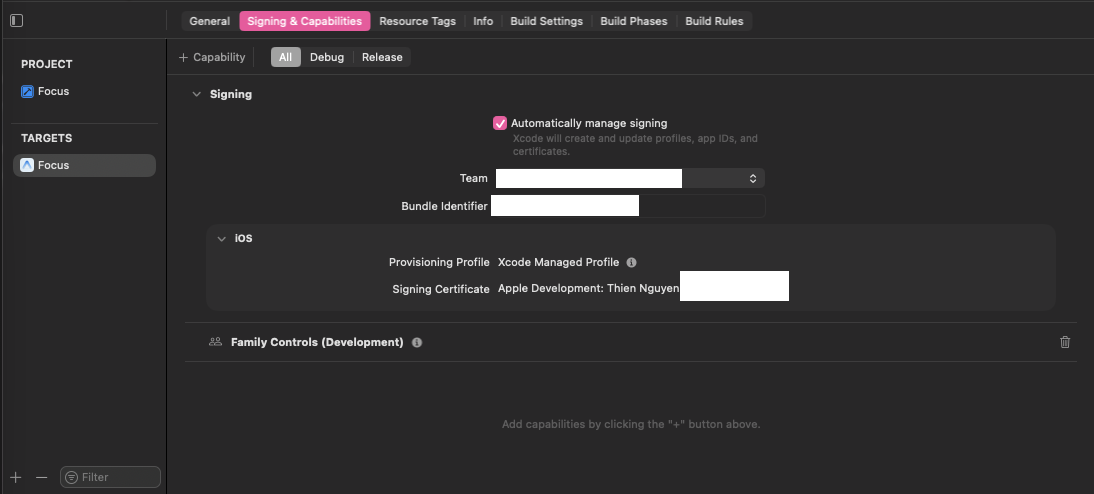
Under your app -> Signing & Capabilities, All tab.
In Team, choose your Apple Developer account.
You should also see Family Controls automatically added, if not, click + Capability and choose Family Controls (Development). You can learn how to add capability here.
The end result will look like this.
Under Pods -> Development Pods you should see your Pod ExpoApps.
Open ExpoAppModule.swift and clean your swift file. I will define two main async function here, authorizeAsync and showPicker. We will start with authorizeAsync first.
// ExpoAppModule.swift

import ExpoModulesCore
import FamilyControls

public class ExpoAppsModule: Module {
    public func definition() -> ModuleDefinition {
        Name("ExpoApps")

        // Request authorization
        AsyncFunction("authorizeAsync") { (promise: Promise) in
            Task {
                do {
                    if #available(iOS 16.0, *) {
                        try await AuthorizationCenter.shared.requestAuthorization(for: .individual)
                        promise.resolve(true)
                    } else {
                        promise.resolve(false)
                    }
                } catch {
                    promise.reject("AUTHORIZATION_ERROR", error.localizedDescription)
                }
            }
        }
    }
}
You had to make sure the promise argument has to be the last argument.
In the code, I've checked whether our user is at least on iOS 16.0, and then request authorization from AuthorizationCenter which comes from FamilyControls. If the user is not on at least iOS 16.0 or any error happened, I simply reject it for now.
Now, inside ExpoAppsModule.ts.
// ExpoAppsModule.ts
import { NativeModule, requireNativeModule } from "expo";

declare class ExpoAppsModule extends NativeModule {
  // using the same name as we defined in ExpoAppModule.swift
  // The function is an async function so we return a Promise
  authorizeAsync: () => Promise<void>;
}

// This call loads the native module object from the JSI.
export default requireNativeModule<ExpoAppsModule>("ExpoApps");
Now let's call the function we just implemented in our javascript.
// app/(tabs)/index.tsx

import { Button, View } from "react-native";

import ExpoAppsModule from "@/modules/expo-apps/src/ExpoAppsModule";

export default function HomeScreen() {
  return (
    <View style={{ flex: 1, justifyContent: "center" }}>
      <Button
        title="Authorize"
        onPress={async () => await ExpoAppsModule.authorizeAsync()}
      />
    </View>
  );
}
Now in order to run our app, you can either bun run ios but since I already have Xcode open, I will run the app using Xcode and start Expo development server using bun start.
Now to show a picker modal for our user to choose an App. We will need a View to show our picker modal.
// ExpoAppsView.swift

import ExpoModulesCore
import SwiftUI
import FamilyControls

struct ExpoAppsView: View {

    @State var selection = FamilyActivitySelection()

    @Environment(\.presentationMode) var presentationMode


    var body: some View {
        NavigationView {
            FamilyActivityPicker(selection: $selection)
            // 2. Add the Navigation Title
                .navigationTitle("Select Apps")
                .navigationBarTitleDisplayMode(.inline)

            // 3. Add the Toolbar buttons
                .toolbar {
                    // The Cancel/Close Button (Top Left)
                    ToolbarItem(placement: .cancellationAction) {
                        Button("Close") {
                            // Close the view
                            presentationMode.wrappedValue.dismiss()
                        }
                    }

                    // The Done/Accept Button (Top Right)
                    ToolbarItem(placement: .confirmationAction) {
                        Button("Done") {
                            // Save selection and close
                            saveSelection()
                            presentationMode.wrappedValue.dismiss()
                        }
                    }
                }
        }
        .foregroundStyle(.black)
    }

    func saveSelection() {
            // Call your method to send data back to React Native/Expo here
            print("User selected: \(selection)")

            // I won't implement the code to send this back to the Javascript side but
            // you can check out those at https://docs.expo.dev/modules/module-api/#sending-events
    }

}
// ExpoAppModule.swift

import ExpoModulesCore
import SwiftUI
import FamilyControls

    // code .....
    // Show family activity picker
    AsyncFunction("showPicker") { (promise: Promise) in
        // Updating the UI using the main thread
        DispatchQueue.main.async {
            // Using Expo's util currentViewController to get the current view
            guard let currentViewController = self.appContext?.utilities?.currentViewController() else {
                promise.reject("NO_ROOT_VC", "Cannot find current view controller")
                return
            }

            let pickerView = ExpoAppsView()
            let hostingController  = UIHostingController(rootView: pickerView)

            // present our View which is ExpoAppsView which will show a picker modal
            currentViewController.present(hostingController, animated: true)

        }
    }
With all that native code done, let's define our method in the JS side so we have a type-safe checks. And again, this new showPicker function will return a Promise also.
// ExpoAppsModule.ts

import { NativeModule, requireNativeModule } from "expo";

declare class ExpoAppsModule extends NativeModule {
  authorizeAsync: () => Promise<void>;

  showPicker: () => Promise<void>;
}

// This call loads the native module object from the JSI.
export default requireNativeModule<ExpoAppsModule>("ExpoApps");
Import that new function to our screen, and try calling it.
import { Button, View } from "react-native";

import ExpoAppsModule from "@/modules/expo-apps/src/ExpoAppsModule";

export default function HomeScreen() {
  return (
    <View style={{ flex: 1, justifyContent: "center" }}>
      <Button
        title="Authorize"
        onPress={async () => await ExpoAppsModule.authorizeAsync()}
      />

      {/* A new button to call showPicker */}
      <Button
        title="Show picker"
        onPress={async () => await ExpoAppsModule.showPicker()}
      />
    </View>
  );
}
The end result can look like this.
In Conclusion
Building react native apps from scratch takes a lot of effort to write native modules for both Android and iOS. Luckily with the help of the community and wonderful companies make this easier for us, we now have a lot of reusable packages for most of our use cases such as Camera, Video, Bluetooth, Notifications, etc..
But by writing apps in both JavaScript and native, it can truly unlock the potential of talents where teams can work across different platforms.
A public repo of this blog can be found here: https://github.com/iuuukhueeee/demo-expo-modules.